Tuesday, August 12, 2014

Unix: Controlling privileged access

One of the most important things you can do for security on a Unix system is restrict root access. But the issue is more complicated than who knows root's password.

If your job involves protecting the security of Unix servers, you need to know about and verify the various ways that people can exercise root (i.e., superuser) privilege. This is especially true of you find yourself inheriting the systems administrator role from other people. A quick check of a handful of issues can help you be sure your view of security on the
servers is realistic.

Who has root access?

If the answer is "nobody but you", that's a great starting point, but you should still change root's password periodically. In addition, you should store it in a safe place -- maybe a secure password tool such as Keepass, maybe in an actual safe. One of my bosses from decades ago had me write down the root passwords we used on our large Solaris network and put them in a safe that nearly no one had access to. In case I got run over by a back hoe, someone would be able to keep our servers up to snuff.

How do they have it?

Root access is possible even if you don't know root's password, so you shouldn't run off thinking you've closed off others' access to this privilege just because you changed the root password to "N01canGuessMe@all!". Check the /etc/sudoers file to see if root privileges have been granted through it. Individuals might be able to run specific commands as root or might be able to use the command "sudo su -" and simply assume root's identity. When they do this, of course, they will be prompted to enter a password but not root's -- their own.

Can they log in as root?

The worst thing about anyone being able to log in directly as root is that you then have no accountability for what these individuals' do when logged in as root. All you know is that someone logged in as root on Saturday night after 11 PM and maybe what they did -- or maybe not. Legitimate users should log in as themselves and switch user to root when they need to make changes to the system that they cannot do with their own privileges. If you have coworkers who help out administering your Unix systems and they perform only a limited set of tasks, you might give them just the necessary privileges. Maybe they can add or remove accounts or reboot the servers, but nothing else.
To prevent direct logins as root, set root's shell to /sbin/nologin in the /etc/passwd file. Verify that /sbin/nologin exists on your system as this might not work on all Unix systems. Verify this works before you log off. You should still be able to su to root.

Root's UID is 0

When looking into who has root access on a Unix system, don't forget the root privilege is associated with the UID 0. If you have another user set up on your system who also has his UID set to 0, that person will have root privileges when he or she logs in. Don't be fooled.
just:x:0:2000:vxl eod:/home/eodj:/bin/bash


Wednesday, October 16, 2013

Unix: When pipes get names

                 Unix pipes are wonderful because they keep you from having to write intermediate command output to disk (relatively slow) and you don’t need to clean up temporary files afterwards. Once you get the knack, you can string commands together and get a lot of work done with a single line of commands. But there are two types of pipes that you can use when working on a Unix system – regular, unnamed or anonymous pipes and named pipes. These two types of pipes share some advantages, but are used and implemented very differently.

The more common type of pipe allows you to take the output of one command, say ps –ef, and pass it to another command, say grep, to be processed further. Just stick a | between the commands and, voila, you have a pipe and probably some useful output. In fact, you can string together commands and pipes until you run out of things to do with the data you are manipulating. I have seen some clever one-liners with three or four pipes. These pipes exist inside the Unix kernel.

Named pipes, like their unnamed counterparts, allow separate processes to communicate, but they do so by establishing a presence in the file system. They are sometimes referred to as FIFOs. FIFO stands for “first in, first out” and, as you might suspect, these pipes work like a line at the supermarket. If you get in line first, you should be the first to push your shopping cart out to the parking lot. But, unlike unnamed pipes, these pipes can be viewed with the ls command and are created with the mkfifo command.

$ mkfifo mypipe
$ ls -l mypipe
prw-r----- 1 shs geeks 0 Sep 29  2013 mypipe
 
Notice that the file type is represented by the letter “p” and that the file has no apparent content. Permissions, as with other files, depend on your umask settings and determine who can read or write to your pipe.

Want to try a simple example? Open two ssh sessions to a system. In one, create your pipe and then send some command output to it.

$ mkfifo mypipe
$ cal > mypipe
 
Don’t worry that your command just seems to hang.
In the other, read from the pipe.

$ cat < mypipe
   September 2013
Su Mo Tu We Th Fr Sa
 1  2  3  4  5  6  7
 8  9 10 11 12 13 14
15 16 17 18 19 20 21
22 23 24 25 26 27 28
29 30
 
What should pop out of this simple demonstration is how your pipe is able to allow processes running in separate sessions to communicate. Depending on permissions, separate processes run by separate users are just as easy. And, of course, these pipes are reusable. They’ll still be sitting in your file system after your commands have completed.

Run this looping script, sending its output to your pipe.

#!/bin/bash

while true
do
    echo "I'm still running"
    sleep 10
done
$ ./loop > mypipe
In the second login session, read from your pipe:
$ cat < mypipe
I’m still running
$
As soon as you ^c in the first window, you should see your session go back to the prompt.
I'm still running
I'm still running
$
 
Depending on what you end up doing with your pipe, you could get a “broken pipe” message in the second window. This means that the input side of the pipe went away too quickly

You can also write scripts or run commands that wait for output from a named before taking the next step – as in this example. In one session, do this:

$ if read line <mypipe; then
> echo this is a test
> fi
 
Again, the session seems to freeze. But then send something through the pipe from the other session and you’ll be back at the prompt:

$ echo hello > mypipe
Check on your first window again and you should see something like this:
$ if read line <mypipe; then
> echo this is a test
> fi
this is a test
 
Named pipes are especially useful if many processes are going to read from and write to your pipes or when processes need to send a lot of information, especially a variety of data, to other processes. You can look for named pipes on your systems using a command such as this:

$ find / -type p -print 2> /dev/null
 
Don't be surprised if you find only a handful. Named pipes can be extremely handy, but they're not heavily used on most Unix systems.

Monday, September 30, 2013

Linux / Unix Command: login

NAME

login - sign on  

SYNOPSIS

login [ name ]
login -p
login -h hostname
login -f name  

DESCRIPTION

login is used when signing onto a system. It can also be used to switch from one user to another at any time (most modern shells have support for this feature built into them, however). If an argument is not given, login prompts for the username.
If the user is not root, and if /etc/nologin exists, the contents of this file are printed to the screen, and the login is terminated. This is typically used to prevent logins when the system is being taken down.
If special access restrictions are specified for the user in /etc/usertty, these must be met, or the log in attempt will be denied and a syslog message will be generated. See the section on "Special Access Restrictions".
If the user is root, then the login must be occurring on a tty listed in /etc/securetty. Failures will be logged with the syslog facility.

After these conditions have been checked, the password will be requested and checked (if a password is required for this username). Ten attempts are allowed before login dies, but after the first three, the response starts to get very slow. Login failures are reported via the syslog facility. This facility is also used to report any successful root logins.

If the file .hushlogin exists, then a "quiet" login is performed (this disables the checking of mail and the printing of the last login time and message of the day). Otherwise, if /var/log/lastlog exists, the last login time is printed (and the current login is recorded).

Random administrative things, such as setting the UID and GID of the tty are performed. The TERM environment variable is preserved, if it exists (other environment variables are preserved if the -p option is used). Then the HOME, PATH, SHELL, TERM, MAIL, and LOGNAME environment variables are set. PATH defaults to /usr/local/bin:/bin:/usr/bin:. for normal users, and to /sbin:/bin:/usr/sbin:/usr/bin for root. Last, if this is not a "quiet" login, the message of the day is printed and the file with the user's name in /var/spool/mail will be checked, and a message printed if it has non-zero length.

The user's shell is then started. If no shell is specified for the user in /etc/passwd, then /bin/sh is used. If there is no directory specified in /etc/passwd, then / is used (the home directory is checked for the .hushlogin file described above).  

OPTIONS

-p
Used by getty(8) to tell login not to destroy the environment
-f
Used to skip a second login authentication. This specifically does not work for root, and does not appear to work well under Linux.
-h
Used by other servers (i.e., telnetd(8)) to pass the name of the remote host to login so that it may be placed in utmp and wtmp. Only the superuser may use this option.
 

SPECIAL ACCESS RESTRICTIONS

The file /etc/securetty lists the names of the ttys where root is allowed to log in. One name of a tty device without the /dev/ prefix must be specified on each line. If the file does not exist, root is allowed to log in on any tty.

On most modern Linux systems PAM (Pluggable Authentication Modules) is used. On systems that do not use PAM, the file /etc/usertty specifies additional access restrictions for specific users. If this file does not exist, no additional access restrictions are imposed. The file consists of a sequence of sections. There are three possible section types: CLASSES, GROUPS and USERS. A CLASSES section defines classes of ttys and hostname patterns, A GROUPS section defines allowed ttys and hosts on a per group basis, and a USERS section defines allowed ttys and hosts on a per user basis.

Each line in this file in may be no longer than 255 characters. Comments start with # character and extend to the end of the line.
 

The CLASSES Section

A CLASSES section begins with the word CLASSES at the start of a line in all upper case. Each following line until the start of a new section or the end of the file consists of a sequence of words separated by tabs or spaces. Each line defines a class of ttys and host patterns.

The word at the beginning of a line becomes defined as a collective name for the ttys and host patterns specified at the rest of the line. This collective name can be used in any subsequent GROUPS or USERS section. No such class name must occur as part of the definition of a class in order to avoid problems with recursive classes.

An example CLASSES section:

CLASSES
myclass1                tty1 tty2
myclass2                tty3 @.foo.com
This defines the classes myclass1 and myclass2 as the corresponding right hand sides.


The GROUPS Section

A GROUPS section defines allowed ttys and hosts on a per Unix group basis. If a user is a member of a Unix group according to /etc/passwd and /etc/group and such a group is mentioned in a GROUPS section in /etc/usertty then the user is granted access if the group is.

A GROUPS section starts with the word GROUPS in all upper case at the start of a line, and each following line is a sequence of words separated by spaces or tabs. The first word on a line is the name of the group and the rest of the words on the line specifies the ttys and hosts where members of that group are allowed access. These specifications may involve the use of classes defined in previous CLASSES sections.

An example GROUPS section.

GROUPS
sys             tty1 @.bar.edu
stud            myclass1 tty4
This example specifies that members of group sys may log in on tty1 and from hosts in the bar.edu domain. Users in group stud may log in from hosts/ttys specified in the class myclass1 or from tty4.

The USERS Section

A USERS section starts with the word USERS in all upper case at the start of a line, and each following line is a sequence of words separated by spaces or tabs. The first word on a line is a username and that user is allowed to log in on the ttys and from the hosts mentioned on the rest of the line. These specifications may involve classes defined in previous CLASSES sections. If no section header is specified at the top of the file, the first section defaults to be a USERS section. An example USERS section:

USERS
zacho           tty1 @130.225.16.0/255.255.255.0
blue            tty3 myclass2
This lets the user zacho login only on tty1 and from hosts with IP addreses in the range 130.225.16.0 - 130.225.16.255, and user blue is allowed to log in from tty3 and whatever is specified in the class myclass2.
There may be a line in a USERS section starting with a username of *. This is a default rule and it will be applied to any user not matching any other line.

If both a USERS line and GROUPS line match a user then the user is allowed access from the union of all the ttys/hosts mentioned in these specifications.
 

Origins

The tty and host pattern specifications used in the specification of classes, group and user access are called origins. An origin string may have one of these formats:
o
The name of a tty device without the /dev/ prefix, for example tty1 or ttyS0.

o
The string @localhost, meaning that the user is allowed to telnet/rlogin from the local host to the same host. This also allows the user to for example run the command: xterm -e /bin/login.

o
A domain name suffix such as @.some.dom, meaning that the user may rlogin/telnet from any host whose domain name has the suffix .some.dom.

o
A range of IPv4 addresses, written @x.x.x.x/y.y.y.y where x.x.x.x is the IP address in the usual dotted quad decimal notation, and y.y.y.y is a bitmask in the same notation specifying which bits in the address to compare with the IP address of the remote host. For example @130.225.16.0/255.255.254.0 means that the user may rlogin/telnet from any host whose IP address is in the range 130.225.16.0 - 130.225.17.255.
Any of the above origins may be prefixed by a time specification according to the syntax:

timespec    ::= '[' <day-or-hour> [':' <day-or-hour>]* ']'
day         ::= 'mon' | 'tue' | 'wed' | 'thu' | 'fri' | 'sat' | 'sun'
hour        ::= '0' | '1' | ... | '23'
hourspec    ::= <hour> | <hour> '-' <hour>
day-or-hour ::= <day> | <hourspec>
For example, the origin [mon:tue:wed:thu:fri:8-17]tty3 means that log in is allowed on mondays through fridays between 8:00 and 17:59 (5:59 pm) on tty3. This also shows that an hour range a-b includes all moments between a:00 and b:59. A single hour specification (such as 10) means the time span between 10:00 and 10:59.

Not specifying any time prefix for a tty or host means log in from that origin is allowed any time. If you give a time prefix be sure to specify both a set of days and one or more hours or hour ranges. A time specification may not include any white space.

If no default rule is given then users not matching any line /etc/usertty are allowed to log in from anywhere as is standard behavior.

System Center 2012 SP1 Updated for Linux, Unix and Mac Management

                  Microsoft last week released an update to System Center 2012 Service Pack 1, adding support for the management of Linux and Unix operating systems, along with Mac.
This update, version 5.00.7804.1202, was published on June 10. It adds support for CentOS, Debian, Oracle Linux and Ubuntu Linux OSes, along with AIX, HP-UX and Solaris 11 Unix OSes. Microsoft's download page description also indicates that the update adds support for "Mac OS X 10.6 (Snow Leopard), Mac OS X 10.7 (Lion) and Mac OS X 10.8 (Mountain Lion)." However, the Mac support has been available since April, according to Microsoft's release history.

                   Microsoft first announced System Center 2012 SP1 support for Linux, Unix and Mac clients when it released Service Pack 1 in January. However, it apparently took six months longer for the Linux and Unix management capability to arrive for the Configuration Manager component of System Center 2012 SP1. Adding to this confusion, Microsoft's blogs describe this update as "Cumulative Update 1 for System Center 2012 Configuration Manager SP1." However, Microsoft released CU1 for System Center 2012 Configuration Manager SP1 back in March with a bunch of improvements that didn't include the Linux and Unix management capabilities.

             Another peculiarity is that the management capabilities enabled by this update vary for Linux and Unix clients compared with Mac clients. The supported scenarios for Linux and Unix machines include conducting hardware and software inventories, distributing software and patches, and reporting. On the Mac side, the update supports hardware and software inventories, distributing software and patches, the management of settings to comply with policy, and network discovery. Reporting isn't listed on the Mac side.

             It's a bit confusing that Microsoft describes Configuration Manager as having these management capabilities because it typically depends on having a Windows Intune subscription as well. IT pros can use Configuration Manager for the client management tasks, but it requires adding a "Windows Intune connector" to do so. Even still, a Microsoft TechNet article indicates that there are some management limitations for IT pros on the Android side. For instance, lifecycle management, compliance settings management and hardware inventory aren't possible tasks for IT pros looking to support Android devices, as shown in the following Microsoft table:

Management Tasks Windows RT Windows Phone 8 iOS Android
Device life cycle management such as the ability to retire, wipe, remote wipe, remove, and block devices. Yes Yes Yes No
Compliance settings that include settings for password settings, email management, security, roaming, encryption, and wireless communication. Yes Yes Yes No
Line-of-business app management. Yes Yes Yes Yes
App installation from the store that the device connects to (Windows Store, Windows Phone Store, App Store, Google Play). Yes Yes Yes Yes
Hardware inventory. Yes Yes Yes No


               Microsoft's overall scheme for mobile device management was recently described in a TechEd presentation focusing on System Center 2012 R2 and Windows Server 2012 R2, scheduled for release by year's end. The scheme depends on a device enrollment process, which in turn depends on using the Windows Intune connector. Some things seem to be changing with those upcoming products, such as a suggestion that System Center 2012 R2 Configuration Manager will enable IT pros to manage Android settings.

Ubuntu impresses in Linux enterprise server test

          Network World - Introduced in 1991, Linux boasts an estimated 67 million users worldwide according to linuxcounter.net. Free versions abound, but companies adopting Linux as part of critical infrastructure typically require more support than a community of unpaid, albeit enthusiastic, volunteers can provide.

            The five products we tested -- SUSE Enterprise Server 11 Service Pack 2, Mandriva Business Server 1.0, ClearOS 6 Professional, Red Hat Enterprise Linux 6.4 and Ubuntu 12.04 LTS -- are all enterprise server versions offering commercial support options, either at the OS level or in the form of commercial management tools and support plans.

              For enterprises, the advantages of going with commercial support options include LTR (Long Term Release) versions of the software, improved interoperability, application support and legal protection if A a portion of the open source software is found to infringe on third-party intellectual property rights. Also, vendor longevity is more likely with a Linux distribution that's backed by a commercial revenue stream.

Saturday, March 31, 2012

GNOME 3.4 released with a new web browser and interface improvements

The GNOME Project has released version 3.4 of the GNOME Desktop Environment for Linux and Unix, including a number of additional features, interface improvements and new applications.

New applications included in the release include a document browser and viewer named “Documents”, a new web browser named “Web” (which replaces Epiphany as the standard web browser in GNOME), and a contact manager.

Other additional features in the release include video calling, improved power settings, animated desktops, and the introduction of application menus.

GNOME, along with KDE and Unity, is one of the most commonly used desktop environments for Unix-based operating systems.

Some Linux/Unix Security Guidelines

Unix security  is  a big world including Software  and  hardware, there is no  guaranties to  make your  Unix system safe,  but you can make it very difficult for  the Crackers en Hackers; in this quick guide will show  you  some  simple  steps  to protect  your  system.

 1- Take Care With Passwords:

Use good ones (motherhood statement)
Don’t Use Real Words
Make Sure They Are Not Easily Guessed
Use Combinations Of Upper and Lower Case, Numbers, Punctuation One Method: Take first letter of a sentence or book title, insert numbers and punctuation.

 2- Use Shadow Passwords:

 Allows encrypted passwords to be in a file that is not world readable

3- Use Password Aging:

Requires shadow passwords

4- Restrict Superuser Access:

Restrict where root can log in from
/etc/security restricts root access to devices listed Use wheel group to restrict who can su to root Put users who can su to root in wheel group in /etc/group file.

 5- Use groups to allow access to files that must be shared:

 Otherwise users will set world permission

6- Be careful with SUID and SGID

Avoid setting executables to SUID root
Wrap SUID root wrapper around programs if they must be run SUID root Create special accounts for programs that must run with higher permissions

Carry Private SSH RSA / DSA Key For Connection Using Unix / Linux Shell Script

How do I add my RSA or DSA keyfile in shell script itself for the connection so that I need to carry only one file on my USB pen drive instead of $HOME/.ssh/id_rsa file under Unix / Linux operating systems?


Linux / Unix / Apple OS X / BSD operating system stores your rsa / dsa private and public keys in your $HOME/.ssh/ directory. You can use the following syntax to specific a file from which the identity (private key) for RSA or DSA authentication is used by the ssh command:

ssh -i /path/to/your/rsa_or_dsa_file user@server1.cyberciti.biz
 
The default is ~/.ssh/id_rsa and ~/.ssh/id_dsa for protocol version 2.

Shell Script Hack To Carry ~/.ssh/id_rsa And ~/.ssh/id_dsa In Script Itself

The shell script syntax is as follows:
 
#!/bin/bash
/usr/bin/ssh -i $0 user@server1.cyberciti.biz
exit
 
##################################################
### Append ~/.ssh/id_rsa or ~/.ssh/id_dsa here ###
##################################################
-----BEGIN RSA PRIVATE KEY-----
 
-----END RSA PRIVATE KEY-----
 
Now just run a script and it will get connected to remote server called server1.cyberciti.biz:

$ ./path/to/your/script

Sample Shell Script

I use the following to rescue or connect to my home server called nas.cyberciti.biz:

These examples may expose your private data as it contains the private key for authentication. These files (or shell script) contain sensitive data and should be readable by the user but not accessible by others (read/write/execute)
 
#!/bin/bash
_me="${0##*/}"
_user="root"
_port="22"
_server="nas.cyberciti.biz"
_args="$@"
## Server name validation ##
host $_server &>/dev/null
[ $? -ne 0 ] && { echo "Server '$_server' not found. Set correct \$_server in $_me script."; exit 1; }
 
## Get in ##
ssh -i "${_me}" -p $_port ${_user}@${_server} "$_args"
exit
 
### Replace this with your actual key. This is not a valid key :P ###
-----BEGIN RSA PRIVATE KEY-----
MIIEpgIBAAKCAQEAxPzlOsgLM72jv93rj7Tcw5Sj6V797mLL7GoZKcQIFeo2e3G7
q69bTcaDwnaxf7vTCWdcJbgrQRGbZ6w1EzuB5xC0YYVF2TGlWu1L9n8rGvJQm0OH
tyMMi+O5i+2VwED4gDaLuBE83IZpeaHn6PmSbV3JGstz4QkeW/PqT5XJyCS2qHzo
lWkY/SGXXPn9rM+U5KOAwIdetMQooGdZGkaAWbqmm6Ujsqz6IeKOnP0sQNvvyvpv
UQogLGnJDdI+hrhOtzVZ+qiHmUlJC8EgiWedRz3mFF9G3Z1LSUqR++NAGmGuZFph
utrKNR9LRqis4FzqkGb9rpaT5749yZRqQgJdwwIDAQABAoIBAQCvFDaIsBOEwSAw
/4TGDPHJwuqMGKmInrawQPxsapblI22Y+dTbGtgDoFSrGeNYrA89ZGg5/h4zjvqY
gi4KEfG69NXddx5FlCJrVk0VoKEnKgcKeFK/Kp+UFapr+5YFcblr+w7jYi69sZk9
SfFc17SVD64V6o3rjLc28utmILNe9fHmyLyLuaOvrwrWu1qxds9npDEPHks+0PUN
xaeFzI5zPqWQfiu7j3FjsG2h1QCGL/Uqd5+IYSCqouOgsWCD10PFlryKc9+3PXFU
ZrvB2+U0/LmFcI3+MYgGsCiL3zQzOWZg6hV6mNCHXh5yq4SskKKsntpclF2nrWWx
fUQ07ccBAoGBAPRd9nwUf8tobEGdRSKYM+JqL+DN7yUKqbZsrho9sfvxg537DZRo
24BFRD6GmnZWFq0pgTymDNIyGNI4NNj44VR+oqE4sfsQHRoJ2IJidgDvbZGJqo9Zu
Uib40IdXvYe6rwgjfBaksVUkPNkUZuDGsWuFXvDsZ6ECOl4VHSm5dSPzAoGBAM5d
iPnTwZwoXk2H/F1uwHiBm8ZB6x9FofiN06sf3Und1oQT74LwiHZL/1BA2Oh/kMls
blwfHry3HCBXuFLudd4AV1y9XlonUA4OgcPm4KJJoWfOiRwyZgMNUf9oTl1neo/q
p2pkwIauKUSXH1flZhgATQnKPZnIh6XEIlnNxeLxAoGBAIS/rrEFKc9EMNsMJox+
hmEPMmc7OBi1TDCvpXzX2yJ0tv1RbrUaqXNrLYGR+cMjTTpQe8aIphph4J4CrqLX
wQD3sj1GvUZ7FVC1/0so9IqPyl60c8B/Od21+QItJebgAUm4jSZ33WXVQ8Dhlmmx
RpyUXVkf88PBxBdr/OW3u+0FAoGBAKNB/iZerxGiIhDGHxGvl5b+OkVbSu5fgScI
1MWiaizQ0m+E8fut3Ndxghd0ZeVxXhLrtFcuy3tShW7U1t7NBfROYs7chXNfHIcy
235+ito1LgW0+rZm8nM+sAM7mSRETCo4SNiEq0Ug35GuvHfqVjtyQPwOKY26j4qq
Xd6b2wyRAoGBAMt9sWTgSKUKHnSoxtRG5Yy+g3GainjT4Lc1JUJjBGr7bYio2ZB/
L/W4H2mtZpkx0kYSI+TdzTJh9W15Ck1z+NmZxmCb2rbr4ESjQpWd/9G4MLO6tLtP
sAk1hN1HMU2hXR+ObvtODXamUQjBq72WXpqVgyhIF2TMMVWEMQAdf8Lg
-----END RSA PRIVATE KEY-----
 
Because of the potential for abuse, this file must have strict permissions: read/write for the user, and not accessible by others. Use the chown and chmod commands as follows:

chown vivek:vivek script
chmod 0700 script


Run the script as follows:

$ ./script
$ ./script uptime


Sample outputs:

07:46:03 up 13 days,  1:07,  1 user,  load average: 0.00, 0.00, 0.00

Friday, March 9, 2012

Dell OEM Systems, SUSE Partner on Linux-Based Enterprise Systems

The two organizations are targeting the vast market of businesses that incorporate computers into their final products or solutions—but who are not computer manufacturers. Dell OEM Systems customers, for example, include MRI manufacturers and makers of firewall appliances, said Jeff Otchis, Americas marketing director at Dell OEM Solutions, in an interview.

Often, these companies manufacture their own computers in-house—a time-consuming, expensive side-road away from their primary businesses. Or they turn to regional OEMs that typically cannot offer the same level or range of support a global provider like Dell, Otchis told Channel Insider.

“Customers have really realized the value of partnering with a Tier One computer manufacturer. You don’t have to worry about quality or support,” he said. “We can help them come to market quickly, much more efficiently and focus on differentiating themselves from their customers.”

The market for embedded systems, sometimes called intelligent systems, is expected to reach more than 4 billion units and create $2 trillion in revenue by 2015 vs. $1 trillion in revenue last year, according to IDC. In 2015, these systems will account for about one-third of all unit shipments of major electronic systems, compared with 19 percent in 2010, the research company said. These systems collect data and automate actions in consumer and industrial applications, including vending machines, refrigerators, cars, and assembly lines.

Use of Linux to power these and other devices is also increasing, researchers found. In one Gartner study, more than half of 547 IT leaders in 11 countries surveyed have adopted OSS as part of their IT strategy; almost one-third cited benefits such as flexibility, increased innovation, shorter development times, and faster procurement processes, as well as lower total cost of ownership, Gartner reported.

Through this agreement, Dell and SUSE are simplifying the process and extending their existing relationship, Kerry Kim, director of solution marketing at SUSE told Channel Insider.

“We’re seeing increasing demand for companies wanting to deploy integrated systems – take hardware and software and customize it for a specific need--as companies are realizing, 'Yes, I used to do this myself, but I’m better off letting the folks who are expert do it because, at the end of the day, it’s much most cost-effective,'” he said. “Dell's got a really good supply chain foundation of expertise. They’ve got a great factory for turning out [systems]. And we’ve got a really good customizable Linux operating system.”

Dell will use SUSE Studio, an image customization and provisioning tool, to build and deploy application stacks based on SUSE Linux Enterprise Server onto Dell OEM Solutions’ embedded, built-to-order, and customized solutions. With SUSE Studio, Dell can help its OEM customers reduce the complexity and overhead costs associated with bringing integrated systems to market.

"There are a lot of companies out there that have historically done this themselves. They may already be working with SUSE or a variety of Linux. We’re offering them the opportunity to get out of that, and focus on what they do best,” he said. "A lot of companies up until now have not had the choice of incorporating Linux into their operating system in this well-supported fashion. They’ve been doing it on their own.”


Google Takes 'Ice Cream Sandwich' Open Source

Google (NASDAQ:GOOG) Nov. 14 rolled out the source code for its Android 4.0 "Ice Cream Sandwich" operating system, signaling that platform is moving closer to prime time.

ICS, which symbolizes the unification of the 2.x smartphone branch and the Android Honeycomb tablet branch, borrows holographic user interface traits from Honeycomb, and makes apps tailored for tablets compatible on the smaller smartphone form factor.

Software navigation keys, a redesigned keyboard are all part of ICS, as are the ability to unlock phones via facial detection and Android Beam, a near field communications app that lets users share Web pages and documents by tapping two ICS-based phones together.

Google released the ICS source code for version 4.0.1, which is powering the Samsung Galaxy Nexus smartphone, on Android's Open-Source Project git servers, said Jean-Baptiste Queru, a software engineer for Google's Android open source project, in a post on the company's Android building group.

The Galaxy Nexus, the first ICS phone, has a huge, 4.65-inch display, is powered by a 1.2GHz processor and runs on 4G LTE (Long Term Evolution) networks from Verizon Wireless. It could arrive from the carrier in the U.S. Nov. 21, which is when Google completes its 10-day Galaxy Nexus smartphone giveaway.

Developers will find links to the code repositories here. Queru noted that developers will find a device build target named "full_maguro" in the source tree that they can use to build a system image for the Galaxy Nexus.

This tree includes all of the Honeycomb source code, which has been held back by Google several months ago as the company sought to improve it for smartphones. However, Qeuru warned that the code is incomplete so he asked developers to focus on ICS instead.

Queru also warned that because ICS is a larger code push that it will take a awhile to complete. Programmers who sync before it's complete will get a broken, unusable copy.

Apache Releases Hadoop 1.0

The Apache Software Foundation (ASF) has announced Apache Hadoop 1.0, the open-source software framework for reliable, scalable, distributed computing.

The Jan. 4 release marks a major milestone six years in the making, and has achieved the level of stability and enterprise-readiness to earn the 1.0 designation, Apache officials said.

"In addition to the major security improvements and support for HBase, the really big deal about version 1.0 is this is a release we feel that people can look at as very stable," Apache Hadoop Vice President Arun Murthy told eWEEK. "The developer community is really up for supporting version 1.0, and we expect 1.0 adoption to be much faster than for other versions."

Murthy said Apache Hadoop 1.0 reflects six years of development, production experience, extensive testing, and feedback from hundreds of knowledgeable users, data scientists and systems engineers, culminating in a highly stable, enterprise-ready release of the fastest-growing big data platform. It includes support for:
  • HBase (sync and flush support for transaction logging)
  • Security (strong authentication via Kerberos)
  • Webhdfs (RESTful API to HDFS)
  • Performance-enhanced access to local files for HBase
  • Other performance enhancements, bug fixes and features
  • All version 0.20.205 and prior 0.20.2xx features
Apache Hadoop serves as a foundation of cloud computing and is at the epicenter of "big data" solutions, ASF officials said. Hadoop enables data-intensive distributed applications to work with thousands of nodes and exabytes of data. Hadoop also enables organizations to more efficiently and cost-effectively store, process, manage and analyze the growing volumes of data being created and collected every day. And it connects thousands of servers to process and analyze data at supercomputing speed.

"This release is the culmination of a lot of hard work and cooperation from a vibrant Apache community group of dedicated software developers and committers that has brought new levels of stability and production expertise to the Hadoop project," Murthy said in a statement. "Hadoop is becoming the de facto data platform that enables organizations to store, process and query vast torrents of data, and the new release represents an important step forward in performance, stability and security."

Cloud, Big Data, Virtualization Driving Enterprise Linux Growth

Linux is poised for continued growth among new and existing users thanks to lower total cost of ownership, technical features and security, among other reasons, according a recent Linux Foundation survey.

The January 2012 report from the Linux Foundation and Yeoman Technology Group titled "Linux Adoption Trends 2012: A Survey of Enterprise End Users" claims that affinity among new and veteran Linux users continues to increase at the expense of Windows and Unix. Eighty-four percent of organizations currently using Linux have expanded its usage over the last 12 months and continue to rely on it as their preferred platform for "Greenfield" deployments, as well as for mission-critical applications.

According to the Linux Foundation, part of this growth is due to Linux's role in two of today's biggest IT trends: supporting the increasing level of big data and achieving productivity and security gains with virtualization and cloud computing. Enterprise Linux users show steady progress on all of these fronts and a clear preference for Linux as the foundation for these trends.

Indeed, the survey showed that once enterprises deploy Linux, they stick with Linux and plan to add more Linux because the platform provides sustainable benefits that include a broad feature set, security, cost-savings and flexibility. Linux also supports the next generation of computing, supporting growing levels of data, cloud computing and virtualization. "We also expect to see it support the social enterprise, energy-efficiency projects and an increasingly connected world in the year ahead," the report said.

Although the foundation polled 1,893 enterprise Linux users, the results of this survey were based on responses from 428 IT professionals from organizations with $500 million or more a year in revenue or 500-plus employees. The vast majority, 65.6 percent, identified themselves as IT staff or developers and represented a wide range of industries. Users from the United States and Canada made up 41.6 percent of the respondents, 27.1 percent were from Europe, and 15.2 percent from Asia.

The survey also showed that eight out of 10 respondents say that they have both added Linux servers in the last 12 months and plan to add more in the next 12 months, with the same number planning to add more Linux in the next five years. Only 21.7 percent of respondents said they are planning an increase in Windows servers during that same period the next five years.

In addition, more than 75 percent of respondents expressed concern about big data, and nearly 72 percent are choosing Linux to support it. Most enterprises expressed concern with the rapid growth of data, and Linux is clearly the platform of choice to address it. Only 35.9 percent are planning to use Windows to meet the demands of this new environment.

Moreover, Linux users said they see fewer issues impeding the operating system's success. Technical issues cited by Linux users dropped 40 percent, from 20.3 percent in 2010 to 12.2 percent today. Twenty-two percent fewer respondents cited perception by management as an issue, and 10 percent fewer said there are no issues at all impeding the success of Linux.

According to the survey, the top driver for enterprise users adopting Linux was lower total cost of ownership at 70 percent. Second was features and technical superiority at 68.6 percent. And third was security, with 63.6 percent of respondents citing it as their main reason for moving to Linux.

Cloud computing is another growth area for Linux users. For 2012 there is a 34 percent increase in organizations migrating some of their applications to cloud-based computing. Indeed, all told, 61 percent of organizations now cite cloud-based applications, whether public, private or hybrid.

Of those users in the cloud, 66 percent are using Linux as their primary platform, up 4.7 percent from last year. Going forward, 34.9 percent of organizations are planning to migrate more applications to the cloud, up from 26 percent last year.

Thursday, March 8, 2012

10 Practical Linux nm Command Examples

he nm commands provides information on the symbols being used in an object file or executable file.
The default information that the ‘nm’ command provides is :
  • Virtual address of the symbol
  • A character which depicts the symbol type. If the character is in lower case then the symbol is local but if the character is in upper case then the symbol is external
  • Name of the symbol

The characters that identify symbol type describe :
  • A :  Global absolute symbol.
  • a  :  Local absolute symbol.
  • B : Global bss symbol.
  • b : Local bss symbol.
  • D : Global data symbol.
  • d : Local data symbol.
  • f : Source file name symbol.
  • L : Global thread-local symbol (TLS).
  • l : Static thread-local symbol (TLS).
  • T : Global text symbol.
  • t  : Local text symbol.
  • U : Undefined symbol.
Note that this list is not exhaustive but contains some important symbol types. For complete information please refer to the man page of this utility.

The default way to use ‘nm’ utility is :

$ nm <object file or executable name>
 
if no executable name is given then nm assumes the name to be ‘a.out’.

With the basic idea about this utility, one may question that why this information would be required?
Well, suppose that you have an executable that is made of many different object files . Now assume that while compiling the code, the linker gives error about an unresolved symbol ‘temp’. Now it will become a nightmare to find where the symbol ‘temp’ is in the code if the code is too large and includes a lot of headers. It is here where this utility comes to rescue. With some extra options, this utility also gives the file in which the symbol is found.

Since now we have a basic idea about the nm utility. Lets understand the usage of this utility through some practical commands.

1. Display Object Files that Refer to a Symbol

The following command displays all the object files that refer to the symbol ‘func’ in my current directory

$ nm  -A ./*.o | grep func

./hello2.o:0000000000000000 T func_1
./hello3.o:0000000000000000 T func_2
./hello4.o:0000000000000000 T func_3
./main.o:                   U func
./reloc.o:                  U func
./reloc.o:0000000000000000  T func1
./test1.o:0000000000000000  T func
./test.o:                   U func
 
Note that the -A flag is used to display the file name along with other information. So we see that in the output we get all the object files where the symbol ‘func’ is being used. This could be extremely useful in cases we want know how which object files are using a particular symbol.

2. Display all Undefined Symbols in an Executable

The following command lists all the undefined symbols in an executable file ’1′

$ nm -u 1
w _Jv_RegisterClasses
w __gmon_start__
U __libc_start_main@@GLIBC_2.2.5
U free@@GLIBC_2.2.5
U malloc@@GLIBC_2.2.5
U printf@@GLIBC_2.2.5
 
Note that the flag ‘-u’ is used in this case for listing only the undefined symbols. This could be extremely useful in cases where one may want to know about the undefined symbols being used in the code that could either really be unresolved or could be resolved on run time through shared libraries.


3. Display all Symbols in an Executable

The following command lists all the symbols in the executable ‘namepid’ but in sorted order of their addresses

$ nm -n namepid
w _Jv_RegisterClasses
w __gmon_start__
U __libc_start_main@@GLIBC_2.2.5
U exit@@GLIBC_2.2.5
U fclose@@GLIBC_2.2.5
U fgets@@GLIBC_2.2.5
U fopen@@GLIBC_2.2.5
U fork@@GLIBC_2.2.5
U memset@@GLIBC_2.2.5
U printf@@GLIBC_2.2.5
U puts@@GLIBC_2.2.5
U signal@@GLIBC_2.2.5
U sleep@@GLIBC_2.2.5
U strchr@@GLIBC_2.2.5
U strlen@@GLIBC_2.2.5
U strncat@@GLIBC_2.2.5
U strncpy@@GLIBC_2.2.5
U system@@GLIBC_2.2.5
0000000000400778 T _init
00000000004008a0 T _start
00000000004008cc t call_gmon_start
00000000004008f0 t __do_global_dtors_aux
...
...
...
 
We see that by using the flag ‘-n’, the output comes out to be in sorted with the undefined symbols first and then according to the addresses. Sorting could make life of a developer easy who is debugging a problem.

4. Search for a Symbols and Display its Size

The following command searches for a symbol ‘abc’ and also displays its size

$ nm  -S 1 | grep abc
0000000000601040 0000000000000004 B abc
 
So we see that the flag -S displays an extra information about the size of the symbol ‘abc’

5. Display Dynamic Symbols in an Executable

The following command displays on dynamic symbols in the executable ’1′.

$ nm  -D 1
w __gmon_start__
U __libc_start_main
U free
U malloc
U printf
 
This could be extremely useful in cases where one is interested to know about the symbols that can only be resolved by shared libraries at the run time.

6. Extract Symbols of Various Types

Another powerful feature of nm command is to be able to extract out symbol from various types of object file format. Normally on Linux we have either ‘a.out’ or ELF format object or executable code but if an object or executable code is of some other format then also nm provides a flag ‘–target’ for it.

7. Change the Format of the nm Output

By default the format of output displayed by nm is the bsd type. We can change the format using the flag -f.  The following command displays the output of nm command in posix style.

$ nm -u -f posix 1
_Jv_RegisterClasses w
__gmon_start__ w
__libc_start_main@@GLIBC_2.2.5 U
free@@GLIBC_2.2.5 U
malloc@@GLIBC_2.2.5 U
printf@@GLIBC_2.2.5 U
 
Similarly we can use ‘-f sysv’ if we want the output to be in systemV style.

8. Display Only the External Symbols of an Executable

The following command lists only the external symbols in the executable

$ nm -g 1
0000000000400728 R _IO_stdin_used
w _Jv_RegisterClasses
0000000000600e30 D __DTOR_END__
0000000000601030 A __bss_start
0000000000601020 D __data_start
0000000000601028 D __dso_handle
w __gmon_start__
0000000000400640 T __libc_csu_fini
0000000000400650 T __libc_csu_init
...
Please note that the use of flag -g enables the output of only external symbols. This could come in handy while specially debugging external symbols.

9. Sort the nm Output by the Symbol Size

The following command sorts the output by the size of symbols

$ nm -g --size-sort 1
0000000000000002 T __libc_csu_fini
0000000000000004 R _IO_stdin_used
0000000000000004 B abc
0000000000000084 T main
0000000000000089 T __libc_csu_init
 
Note that the flag –size-sort sorts the output with respect to size. As already explained -g is used to display only external symbols.

10. Specify nm Options in a File

Another valuable feature of nm is that it can take its command line input from a file. You can specify all the options in a file and specify the file name to nm command and it will do the rest for you. For example, in the following command the nm utility reads the command line input from the file ‘nm_file’ and produces the output

Please note that the symbol ‘@’ is required if you provide the file name.

$ nm @nm_file
0000000000000002 T __libc_csu_fini
0000000000000004 R _IO_stdin_used
0000000000000004 B abc
0000000000000084 T main
0000000000000089 T __libc_csu_init

Reverse Engineering Tools in Linux – strings, nm, ltrace, strace, LD_PRELOAD

Reverse engineering is the act of figuring out what a software does, to which there is no source code available. Reverse engineering may not give you the exact details of the software. But you can understand fairly well about how a software was implemented.

The reverse engineering involves the following three basic steps:
  1. Gathering the Info
  2. Determining Program behavior
  3. Intercepting the library calls

I. Gathering the Info

The first step is to gather the information about the target program and what is does. For our example, we will take the ‘who’ command. ‘who’ command prints the list of currently logged in users.

1. Strings Command

Strings is a command which print the strings of printable characters in files. So now let’s use this against our target (who) command.

# strings /usr/bin/who
 
Some of the important strings are,

users=%lu
EXIT
COMMENT
IDLE
TIME
LINE
NAME
/dev/
/var/log/wtmp
/var/run/utmp
/usr/share/locale
Michael Stone
David MacKenzie
Joseph Arceneaux
 
From the about output, we can know that ‘who’ is using some 3 files (/var/log/wtmp, /var/log/utmp, /usr/share/locale).

2. nm Command

nm command, is used to list the symbols from the target program. By using nm, we can get to know the local and library functions and also the global variables used. nm cannot work on a program which is striped using ‘strip’ command.

Note: By default ‘who’ command is stripped. For this example, I compiled the ‘who’ command once again.

# nm /usr/bin/who
 
This will list the following:

08049110 t print_line
08049320 t time_string
08049390 t print_user
08049820 t make_id_equals_comment
080498b0 t who
0804a170 T usage
0804a4e0 T main
0804a900 T set_program_name
08051ddc b need_runlevel
08051ddd b need_users
08051dde b my_line_only
08051de0 b time_format
08051de4 b time_format_width
08051de8 B program_name
08051d24 D Version
08051d28 D exit_failure
 
In the above output:
  • t|T – The symbol is present in the .text code section
  • b|B – The symbol is in UN-initialized .data section
  • D|d – The symbol is in Initialized .data section.
The Capital or Small letter, determines whether the symbol is local or global.
From the about output, we can know the following,
  • It has the global function (main,set_program_name,usage,etc..)
  • It has some local functions (print_user,time_string etc..)
  • It has global initialized variables (Version,exit_failure)
  • It has the UN-initialized variables (time_format, time_format_width, etc..)
Sometimes, by using the function names we can guess what the functions will do.


The other commands that can be used to get information are

II. Determining Program Behavior

3. ltrace Command

It traces the calls to the library function. It executes the program in that process.

# ltrace /usr/bin/who
 
The output is shown below.

utmpxname(0x8050c6c, 0xb77068f8, 0, 0xbfc5cdc0, 0xbfc5cd78)          = 0
setutxent(0x8050c6c, 0xb77068f8, 0, 0xbfc5cdc0, 0xbfc5cd78)          = 1
getutxent(0x8050c6c, 0xb77068f8, 0, 0xbfc5cdc0, 0xbfc5cd78)          = 0x9ed5860
realloc(NULL, 384)                                                   = 0x09ed59e8
getutxent(0, 384, 0, 0xbfc5cdc0, 0xbfc5cd78)                         = 0x9ed5860
realloc(0x09ed59e8, 768)                                             = 0x09ed59e8
getutxent(0x9ed59e8, 768, 0, 0xbfc5cdc0, 0xbfc5cd78)                 = 0x9ed5860
realloc(0x09ed59e8, 1152)                                            = 0x09ed59e8
getutxent(0x9ed59e8, 1152, 0, 0xbfc5cdc0, 0xbfc5cd78)                = 0x9ed5860
realloc(0x09ed59e8, 1920)                                            = 0x09ed59e8
getutxent(0x9ed59e8, 1920, 0, 0xbfc5cdc0, 0xbfc5cd78)                = 0x9ed5860
realloc(0x09ed59e8, 3072)                                            = 0x09ed59e8
getutxent(0x9ed59e8, 3072, 0, 0xbfc5cdc0, 0xbfc5cd78)                = 0x9ed5860
getutxent(0x9ed59e8, 3072, 0, 0xbfc5cdc0, 0xbfc5cd78)
 
You can observe that there is a set of calls to getutxent and its family of library function. You can also note that ltrace gives the results in the order the functions are called in the program.

Now we know that ‘who’ command works by calling the getutxent and its family of function to get the logged in users.

4. strace Command

strace command is used to trace the system calls made by the program. If a program is not using any library function, and it uses only system calls, then using plain ltrace, we cannot trace the program execution.

# strace /usr/bin/who
[b76e7424] brk(0x887d000)               = 0x887d000
[b76e7424] access("/var/run/utmpx", F_OK) = -1 ENOENT (No such file or directory)
[b76e7424] open("/var/run/utmp", O_RDONLY|O_LARGEFILE|O_CLOEXEC) = 3
.
.
.
[b76e7424] fcntl64(3, F_SETLKW, {type=F_RDLCK, whence=SEEK_SET, start=0, len=0}) = 0
[b76e7424] read(3, "\10\325"..., 384) = 384
[b76e7424] fcntl64(3, F_SETLKW, {type=F_UNLCK, whence=SEEK_SET, start=0, len=0}) = 0
 
You can observe that whenever malloc function is called, it calls brk() system call. The getutxent library function actually calls the ‘open’ system call to open ‘/var/run/utmp’ and it put’s a read lock and read the contents then release the locks.

Now we confirmed that who command read the utmp file to display the output.
Both ‘strace’ and ‘ltrace’ has a set of good options which can be used.
  • -p pid – Attaches to the specified pid. Useful if the program is already running and you want to know its behavior.
  • -n 2 – Indent each nested call by 2 spaces.
  • -f – Follow fork


III. Intercepting the library calls

5. LD_PRELOAD & LD_LIBRARY_PATH

LD_PRELOAD allows us to add a library to a particular execution of the program. The function in this library will overwrite the actual library function.

Note: We can’t use this with programs set with ‘suid’ bit.

Let’s take the following program.

#include <stdio.h>
int main() {
  char str1[]="TGS";
  char str2[]="tgs";
  if(strcmp(str1,str2)) {
    printf("String are not matched\n");
  }
  else {
    printf("Strings are matched\n");
  }
}
 
Compile and execute the program.

# cc -o my_prg my_prg.c
# ./my_prg
 
It will print “Strings are not matched”.

Now we will write our own library and we will see how we can intercept the library function.

#include <stdio.h>
int strcmp(const char *s1, const char *s2) {
  // Always return 0.
  return 0;
}
 
Compile and set the LD_LIBRARY_PATH variable to current directory.

# cc -o mylibrary.so -shared library.c -ldl
# LD_LIBRARY_PATH=./:$LD_LIBRARY_PATH
 
Now a file named ‘library.so’ will be created.

Set the LD_PRELOAD variable to this file and execute the string comparison program.

# LD_PRELOAD=mylibrary.so ./my_prg
 
Now it will print ‘Strings are matched’ because it uses our version of strcmp function.

Note: If you want to intercept any library function, then your own library function should have the same prototype as the original library function.

Wednesday, March 7, 2012

Understanding File Permissions

What are permissions?

On a UNIX web server, every single file and folder stored on the hard drive has a set of permissions associated with it, which says who is allowed to do what with the file. Every file (and folder) also has an "owner" and a "group" associated with it. If you created the file, then you are usually the owner of that file, and your group, or the group associated with the folder you created the file in, will usually be associated with that file.

Who can do stuff?

There are three types of people that can do stuff to files - the Owner of the file, anyone in the Group that the file belongs to, and Others (everyone else). In UNIX, these 3 types of people are referred to using the letters U (for Owner, or User in UNIX-speak!), G (for Group), and O (for Others).

What stuff can you do?

There are three basic things that can be done to files or folders:
  • You can read the file. For folders, this means listing the contents of the folder.
  • You can write to (change) the file. For folders, this means creating and deleting files in the folder.
  • You can execute (run) the file, if it's a program or script. For folders, this means accessing files in the folder.

What do all these funny letters and numbers mean?!

That's the basics of permissions covered. As you can see, there's not much to them really!
The confusion often occurs when you have to start actually setting permissions on your file server. CGI scripts will tell you to do things like "chmod 755" or "Check that the file is executable". Also, when you use FTP or SSH, you'll see lots of funny letters next to the files (such as rwxrw-rw-). We'll now explain what all these hieroglyphics mean!

When you FTP to your web server, you'll probably see something like this next to every file and folder:

Attributes list
This string of letters, drwxrwxrwx, represents the permissions that are set for this folder. (Note that these are often called attributes by FTP programs.) Let's explain what each of these letters means:

d r w x r w x r w x
  Owner Group Other
Directory Read Write Execute Read Write Execute Read Write Execute

As you can see, the string of letters breaks down into 3 sections of 3 letters each, representing each of the types of users (the owner, members of the group, and everyone else). There is also a "d" attribute on the left, which tells us if this is a file or a directory (folder).

If any of these letters is replaced with a hyphen (-), it means that permission is not granted. For example:
drwxr-xr-x
A folder which has read, write and execute permissions for the owner, but only read and execute permissions for the group and for other users.
-rw-rw-rw-
A file that can be read and written by anyone, but not executed at all.
-rw-r--r--
A file that can be read and written by the user, but only read by the group and everyone else.

Using numbers instead of letters

As we said earlier, you'll often be asked to do things using numbers, such as "set 755 permissions". What do those numbers mean?
Well, each of the three numbers corresponds to each of the three sections of letters we referred to earlier. In other words, the first number determines the owner permissions, the second number determines the group permissions, and the third number determines the other permissions.

Each number can have one of eight values ranging from 0 to 7. Each value corresponds to a certain setting of the read, write and execute permissions, as explained in this table:

Number Read (R) Write (W) Execute (X)
0 No No No
1 No No Yes
2 No Yes No
3 No Yes Yes
4 Yes No No
5 Yes No Yes
6 Yes Yes No
7 Yes Yes Yes

So, for example:

777 is the same as rwxrwxrwx
755 is the same as rwxr-xr-x
666 is the same as rw-rw-rw-
744 is the same as rwxr--r--

Setting permissions

The two most common ways to set permissions on your files and folders is with FTP or SSH. Let's take a look at FTP first.

Setting permissions with FTP

Your FTP program will probably allow you to set permissions on your files by selecting the file (in the remote window) and either right-clicking on it and selecting an option such as CHMOD or Set permissions, or by selecting CHMOD / Set permissions from a menu option.

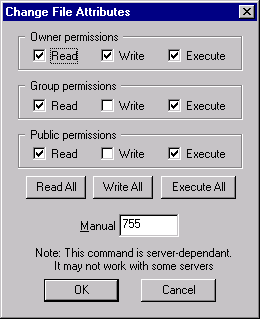
Once you've selected the appropriate menu option, you'll probably see a dialog box similar to the following (this is from CuteFTP for Windows):


As you can see, it's pretty easy to set or un-set read, write and execute permissions for the owner, group and others using the check boxes. Alternatively, you can type in the equivalent 3-digit number, if you know it (see the previous section). Easy!

Setting permissions with SSH

The other common way to set permissions on your files is using SSH (or a standard shell if you're actually sitting at your Web server). This is generally quicker if you want to change lots of files at once (e.g. change all .cgi files in a folder to have execute permission), but is a bit more fiddly for the beginner.
Once you've SSHed to your server and logged in, change to the folder containing the files you want to change, e.g.:


cd mysite/cgi-bin
You can then use the command chmod to set permissions on your files and folders. You can use the number notation described above, or you can use an easier-to-remember letter-based system.

Using number notation

To set permissions with numbers, use the following syntax:

chmod nnn filename
where nnn is the 3-digit number representing the permissions, and filename is the file you want to change. For example:

chmod 755 formmail.cgi
will assign read, write and execute permission to the owner, and just read and execute permission to everyone else, on the script called formmail.cgi.

Using letter notation

You can use the letters u (owner/user), g (group) and o (other) to set permissions for each of the user types, and r (read), w (write) and x (execute) to represent the permissions to set.
You can also use a instead of u, g, and o, to mean all users (u,g,o).
You assign permissions using either the plus sign (+), which means "add these permissions", the minus sign (-), which means "remove these permissions", or the equals sign (=), which means "change the permissions to exactly these".
For example:

chmod a+x formmail.cgi adds execute permissions for all users to the file formmail.cgi (in other words, makes the file executable).

chmod u=rwx formmail.cgi sets read, write and execute permission just for the owner (the permissions for the group and for others remain unchanged).

chmod go-w formmail.cgi removes write permission for the group and for others, leaving the permissions for the owner unchanged.

Checking your permissions

You can check the permissions on all files and folders in the current directory by using the command:
ls -l
This will show you the permissions for every file and folder, in the same way as your FTP program does.

Useful Unix Commands

Advanced use of the ls command

In SSH and basic commands, we showed you how to use ls to obtain a listing of all files in the current directory. By placing various letters after ls (known as switches, options or command line arguments, depending on the UNIX guru you talk to!), you can get it to give you a lot more information about the current directory. For example:

[username@mysite]$ ls -l
will produce a long listing format that includes the permissions, owner, group, size and modified date of each file:

drwxrwxr-x    3 matt     users        4096 Jun 27 17:17 images
-rw-rw-r--    1 matt     users         228 Jun 27 19:29 index.html
-rw-rw-r--    1 matt     users         272 Jun 27 19:30 index2.html 
 
The a switch will also include hidden files (hidden files in UNIX begin with a dot (.) in the listing), as well as the current directory and parent directory entries (. and .. respectively). Also, you can combine switches by placing them one after the other, for example:

[username@mysite]$ ls -al
drwxrwxr-x    3 matt     users        4096 Jun 27 19:32 .
drwxrwxr-x    5 matt     users        4096 Jun 27 17:09 ..
-rw-rw-r--    1 matt     users          23 Jun 27 19:31 .hidden_file
drwxrwxr-x    3 matt     users        4096 Jun 27 17:17 images
-rw-rw-r--    1 matt     users         228 Jun 27 19:29 index.html
-rw-rw-r--    1 matt     users         272 Jun 27 19:30 index2.html 
 

Creating folders with mkdir

mkdir (short for "make directory") lets you create new directories (folders) on your Web server, much the same as the "New Folder" options on Windows PCs and Macs.
To create a directory in the current directory, type mkdir followed by the directory name. For example, to create a new directory in your Web site called coolstuff you might type something like:

[username@mysite]$ cd mysite.com [username@mysite]$ cd htdocs [username@mysite]$ mkdir coolstuff
A quick listing of your site directory would now show something like:

[username@mysite]$ ls coolstuff images images index.html

Copying files and folders with cp

The cp (short for "copy") command allows you to copy files to new files, or copy files and directories to new directories. For example, to copy index.html to index2.html you'd use:

[username@mysite]$ cp index.html index2.html
To copy index.html into an existing directory called coolstuff, use:

[username@mysite]$ cp index.html coolstuff
To copy a whole directory, including its contents, to a new directory, use cp -r (the -r means "recursive"):
[username@mysite]$ ls coolstuff images index.html [username@mysite]$ cp -r coolstuff coolstuff2 [username@mysite]$ ls coolstuff coolstuff2 images index.html
 
To copy a whole directory, including its contents, into an existing directory:

[username@mysite]$ cp -r coolstuff2 coolstuff [username@mysite]$ cd coolstuff [username@mysite]$ ls index.html coolstuff2

Deleting stuff with rm

rm is the UNIX command to delete files and, sometimes, directories. It's short for "remove". Be very careful when deleting stuff with this command, as UNIX usually has no recycle bin or trash can - once you've deleted something, it's gone forever! :(

To delete a single file, use rm filename. For example, to delete index.html you'd do:
[username@mysite]$ rm index.html
To delete a directory and all its contents, use rm -r directory. For example:
[username@mysite]$ rm -r coolstuff
Note that if the directory is empty, you can also delete it using the command rmdir, as follows:
[username@mysite]$ rmdir coolstuff

Playing it safe

If you're deleting stuff with rm, particularly if you're using rm -r, it's a good idea to add the -i switch too, e.g.:
[username@mysite]$ rm -ir coolstuff
This will make sure the system prompts you before deleting each file or directory.

UNIX's online manual

Most UNIX servers come with a great online help system called man. You can use this to get help on most of the available commands by typing man followed by the command. For example, try typing:
[username@mysite]$ man ls
While reading a manual page on Linux, you can page up and down with the Page Up and Page Down keys, and scroll up and down with the Up Arrow and Down Arrow keys. To quit the manual viewer, press the q key. To search for some text, press the forward-slash (/) key and type the text you want to search for, e.g. /file, and press Return.

On non-Linux systems, you usually have to press Enter to go down a line, and the Space bar to go down a page, and you can't scroll up. :(

Running scripts and programs

Often you'll want to be able to run programs such as Perl scripts and executables on your Web server, in much the same way as you run a program from the Start menu in Windows.

In UNIX, running programs is easy - you usually just type the name of the program! In fact, all the commands we've shown you already are programs.

If you want to run a program that's in your current directory, you'll usually need to put a ./ in front of the program name, to tell UNIX that it should look in the current directory for the program, e.g.:
[username@mysite]$ ./myprog
If you're having trouble with a Perl CGI script, you can often find out the exact error message by running it from the UNIX prompt in SSH, rather than through a Web browser. Say you wanted to test a script called formmail.cgi. Run it at the prompt with the word perl before it, like this:

[username@mysite]$ cd cgi-bin [username@mysite]$ perl formmail.cgi
The CGI script will then run as if it were called from a Web browser, but you'll be able to see the exact output from the script appear in the SSH window (as opposed to the browser, where you'll probably just see something unhelpful, such as Internal Server Error!).
 

SSH and Basic Commands

What is SSH?

SSH is a protocol that allows you to connect to a remote computer - for example, your Web server - and type commands to be carried out on that computer, such as moving and copying files, creating directories (folders), and running scripts. To talk to your Web server via SSH, you need an SSH client on your computer - see below - and you also need three pieces of information:
Your Web server's IP address or hostname
Often - but not always - the hostname is the same as your website's domain name.
A username
This is the username that you'll use to login via SSH. Often it's the same as your Web control panel or FTP username.
A password
This is the password that's associated with the above username.
If you're not sure what to use for your hostname, username or password, check with your Web hosting company.

Connecting using an SSH client on Windows

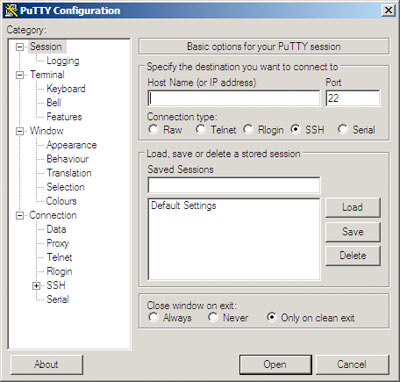
There are many free and commercial SSH client programs available for Windows. A good, popular free client is PuTTY. To use it, simply download the putty.exe file, then double-click putty.exe on your computer to run it. You'll see PuTTY's configuration dialog appear:


Enter your Web server's IP address or hostname in the Host Name (or IP address) box, and click Open. The first time you connect to your Web server, you'll probably see a security alert dialog appear, warning you that PuTTY doesn't know anything about the machine ("host") that you're connecting to. Click Yes to add your server to PuTTY's cache and proceed with the connection.

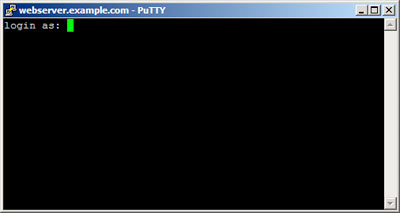
You'll now see a black terminal window appear, containing a "login as:" prompt:

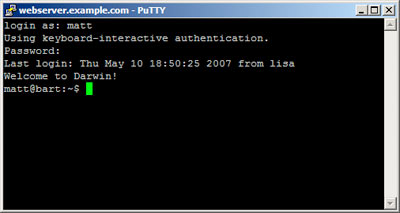
 Enter your username, and press Enter. A "Password:" prompt appears; enter your password and, again, press Enter. If all goes well, you'll now be logged into your Web server. You'll probably see some sort of welcome message from your server, followed by a shell prompt:
 A shell prompt is a small piece of text that lets you know the server is waiting for you to type something. Often the prompt ends in a dollar symbol ($). In our case, the shell prompt is "matt@bart:~$". This tells us that we're logged in with the username "matt", the computer's name is "bart", and we're currently in our home directory (~).

Some basic commands

Congratulations! You've logged in to your Web server using SSH. You can now issue commands to the server by typing them in at the shell prompt:

The ls command

ls is short for "list"; it lists all the files and directories in your current directory (called the working directory in Unix parlance). Type ls and press Enter, and you should see a listing appear in the terminal window:

username@webserver:~$ ls
myfile.txt   myfile2.txt   mysite.com 
 
The exact listing will, of course, depend on what files you have in your directory
on the server!
 

The cd command

cd stands for "change directory", and it allows you to move into and out of directories, much like double-clicking folders on your PC. For example, if mysite.com listed above is the directory containing your website, you can move into the directory as follows:

username@webserver:~$ cd mysite.com 
 
You can then do another ls to list the contents of the mysite.com directory:

username@webserver:~/mysite.com$ ls cgi-bin htdocs logs 
 
To move back up a directory, use cd .. (".." means "the parent directory"). You'll then be back in your original directory:

username@webserver:~/mysite.com$ cd .. username@webserver:~$ ls myfile.txt myfile2.txt mysite.com 
 
Notice how our shell prompt changes to reflect our current directory. Not all shell prompts do this; it depends how your server has been set up.

The pwd command

Often it's useful to know your exact current directory. To find this out, type the command pwd (short for "print working directory") and press Enter. The computer displays the full path to the current directory you're working in:

username@webserver:~$ pwd
/home/users/username/


Monday, March 5, 2012

Stopping VCS in Veritas SF for Oracle RAC environment

If you must stop VCS on a domain where Veritas SF for Oracle RAC is running, the Oracle RAC application on the domain being reconfigured must be brought offline. In addition, the GAB, LLT, LMX, and VXFEN modules must be unconfigured. Performing these steps ensures that other instances do not attempt communication with the stopped instance. This could cause the application to hang, when the instance does not respond.


To stop VCS in a Veritas SF for Oracle RAC environment
  1. Log in as administrator to the domain being reconfigured (wildcat, for example).
  2. List the configured VCS service groups and see which are online in the domain:
    # hagrp -list
  3. Based on the output of step 2, bring each service group that is online to offline in the domain wildcat. Use the following command:
    # hagrp -offline service_grp_name -sys wildcat
  4. Stop VCS.
    # hastop -local
    In addition to port h, this command stops the CVM drivers using ports v and w.
  5. If any CFS file systems outside of VCS control are mounted, unmount them.
  6. Stop and unconfigure the drivers required by DBE/AC:
    # cd /opt/VRTSvcs/rac
    # ./uload_drv
    Unloading qlog
    Unloading odm
    Unloading fdd
    Unloading vxportal
    Unloading vxfs
  7. Unconfigure the VCSMM and I/O fencing drivers, which use ports b and o, respectively:
    # /sbin/vxfenconfig -U
    # /sbin/vcsmmconfig -U
  8. Unconfigure the LMX driver:
    # /sbin/lmxconfig -U
  9. Verify that the drivers h, v, w, f, q, d, b, and o are stopped. They should not show memberships when you use the gabconfig -a command:
    # gabconfig -a
    GAB Port Memberships
    ============================================================
    Port a gen 4a1c0001 membership 01
  10. Unload the VCSMM, I/O fencing, and LMX modules.
    Determine the module IDs for VCSMM, I/O fencing, and LMX:
    # modinfo | egrep "lmx|vxfen|vcsmm"
    237 783e4000 25497 237 1 vcsmm (VERITAS Membership
    Manager)
    238 78440000 263df 238 1 vxfen (VERITAS I/O Fencing)
    239 7845a000 12b1e 239 1 lmx (LLT Mux 3.5B2)
    Unload the VCSMM, I/O fencing, and LMX modules based on their module IDs:
    # modunload -i 237
    # modunload -i 238
    # modunload -i 239
  11. Unconfigure GAB
    # /sbin/gabconfig -U
  12. Unconfigure LLT
    # /sbin/lltconfig -U
  13. Remove the GAB and LLT modules from the kernel.
    Determine the IDs of the GAB and LLT modules:
    # modinfo | egrep "gab|llt"
    305 78531900 30e 305 1 gab
    292 78493850 30e 292 1 llt
    Unload the GAB and LLT modules based on their module IDs:
    # modunload -i 305
    # modunload -i 292
  14. You can begin performing dynamic reconfiguration.